by Susan Zehnder, Education Director
This spring, I’ve shared artifacts,
documents and stories from our museum with more than 1,500 students. They’re
developing a better understanding of what’s inside a History Museum. They’re
also learning that everyone and everything has a story. Many stories are known,
while some are still waiting to be discovered. These stories are important
because they act like glue to stick facts together into a form we can remember,
and help us make sense of things. Through these stories, we can also learn more
about our own histories.
My own story includes pie. I come
from a long line of mid-western pie makers. It doesn’t matter if the pie is
sweet or savory, for dessert or as a main dish, pies are popular in my house.
Our museum has some great examples of both pie artifacts and documents.
For example, here’s a pie pan and
segment cutter to easily and fairly divide slices. This means the slices are
all the same, a bust to dieters or those wanting an extra big piece. Bakeries
and restaurants use a device like this to eliminate guesswork and make serving
slices easy.
Another artifact from our collection
useful in making pies is this wooden rolling pin. The handles are smooth and
worn, a testament to a lot of use.
 |
| Wooden rolling pin, late 19th Century |
While I don’t use a pie segment
cutter, I do use a rolling pin and I learned pie making from my Indiana
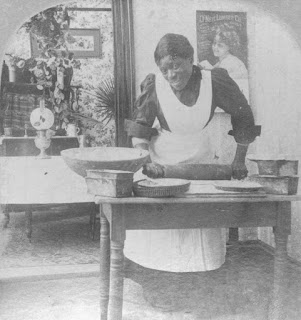
grandmother. Like many women of her time,
my grandmother was a sturdy, can-do
woman, much like the woman pictured here. This image captures that similar attitude
well. My grandmother was a homemaker, and her pie-making skills were the stuff
of family legend. One legend involved her making over forty Thanksgiving pies and
using the hood of my grandfather’s car as a cooling rack.
When it came to making pie crusts,
she had two rules she followed. She passed these rules down to my mother, and to
me, and in my own family, I’ve insisted both my son and daughter learn how to
make a decent pie crust.
Grandma’s Two Rules
First, one of my grandmother’s rules
was, even if making a pie with two crusts, it’s best to mix each crust
separately rather than doubling a recipe. She felt this gave a baker more
control over the ingredients. Her second rule concerned which ingredients to
use. She swore that using solid vegetable oil guaranteed her the best success
when it came to making a flaky pie crust, and always used Crisco. Today there
are good organic substitutes you can find with similar consistencies that work
well. Whichever fat you choose, throw a couple of ice cubes in the water to
keep your fat cool as long as possible. This helps make your dough easy to
handle and roll out. No worries if it’s a warm day, you can just pop the dough
into the refrigerator for 20 minutes to chill before you roll it out.
I also follow the rule that using the
right tools helps.
The Right Tools
In addition to using a large enough
bowl to mix in, and a good rolling pin like the example above, use a pastry
cutter to cut the solid fat into the flour mixture.
Crusts can seem hard but become
easier with practice. If you’d rather just eat pie, you can always pick up a
pie from your favorite local bakery. While a search of Elmira’s business
directory from 1857 lists four professional bakers, by the early 20th
Century there were nineteen bakers listed. Here, this 1901 picture of Rhoades
Bakery shows a crew of bakers posing with pies.
Today we have a lot of options.
But baking or buying, it's always time for pie!
Basic Pie Dough
(Makes one 9-10 inch crust)
1 cup plus 1-2 Tablespoons
all-purpose flour, keep some extra in case things get sticky
1/3 cup solid vegetable shortening
½ teaspoon salt
3-5 Tablespoons ice water
Blend dry ingredients first, then
using a pastry blender cut the mixture while adding the ice water a tablespoon
at a time until desired consistency. Gather into a ball, and roll out.


No comments:
Post a Comment