Sunday, December 18, 2022

Holiday Memories

 by Susan Zehnder, Education Director

In 2020, when the whole world seemed to pause, the annual Elmira Downtown Holiday parade was canceled. Without a parade, CCHS shared 170 images from our collection for a virtual walk down memory lane. You can still see that album on our Facebook page. Eighteen of the images are from a Corning parade, and two are missing dates because we couldn’t confirm when the pictures were taken. Of the 150 remaining images, we thought you might enjoy seeing the top 5 ‘liked’ photos. In order of popularity, here they are.

1958 (64)1958


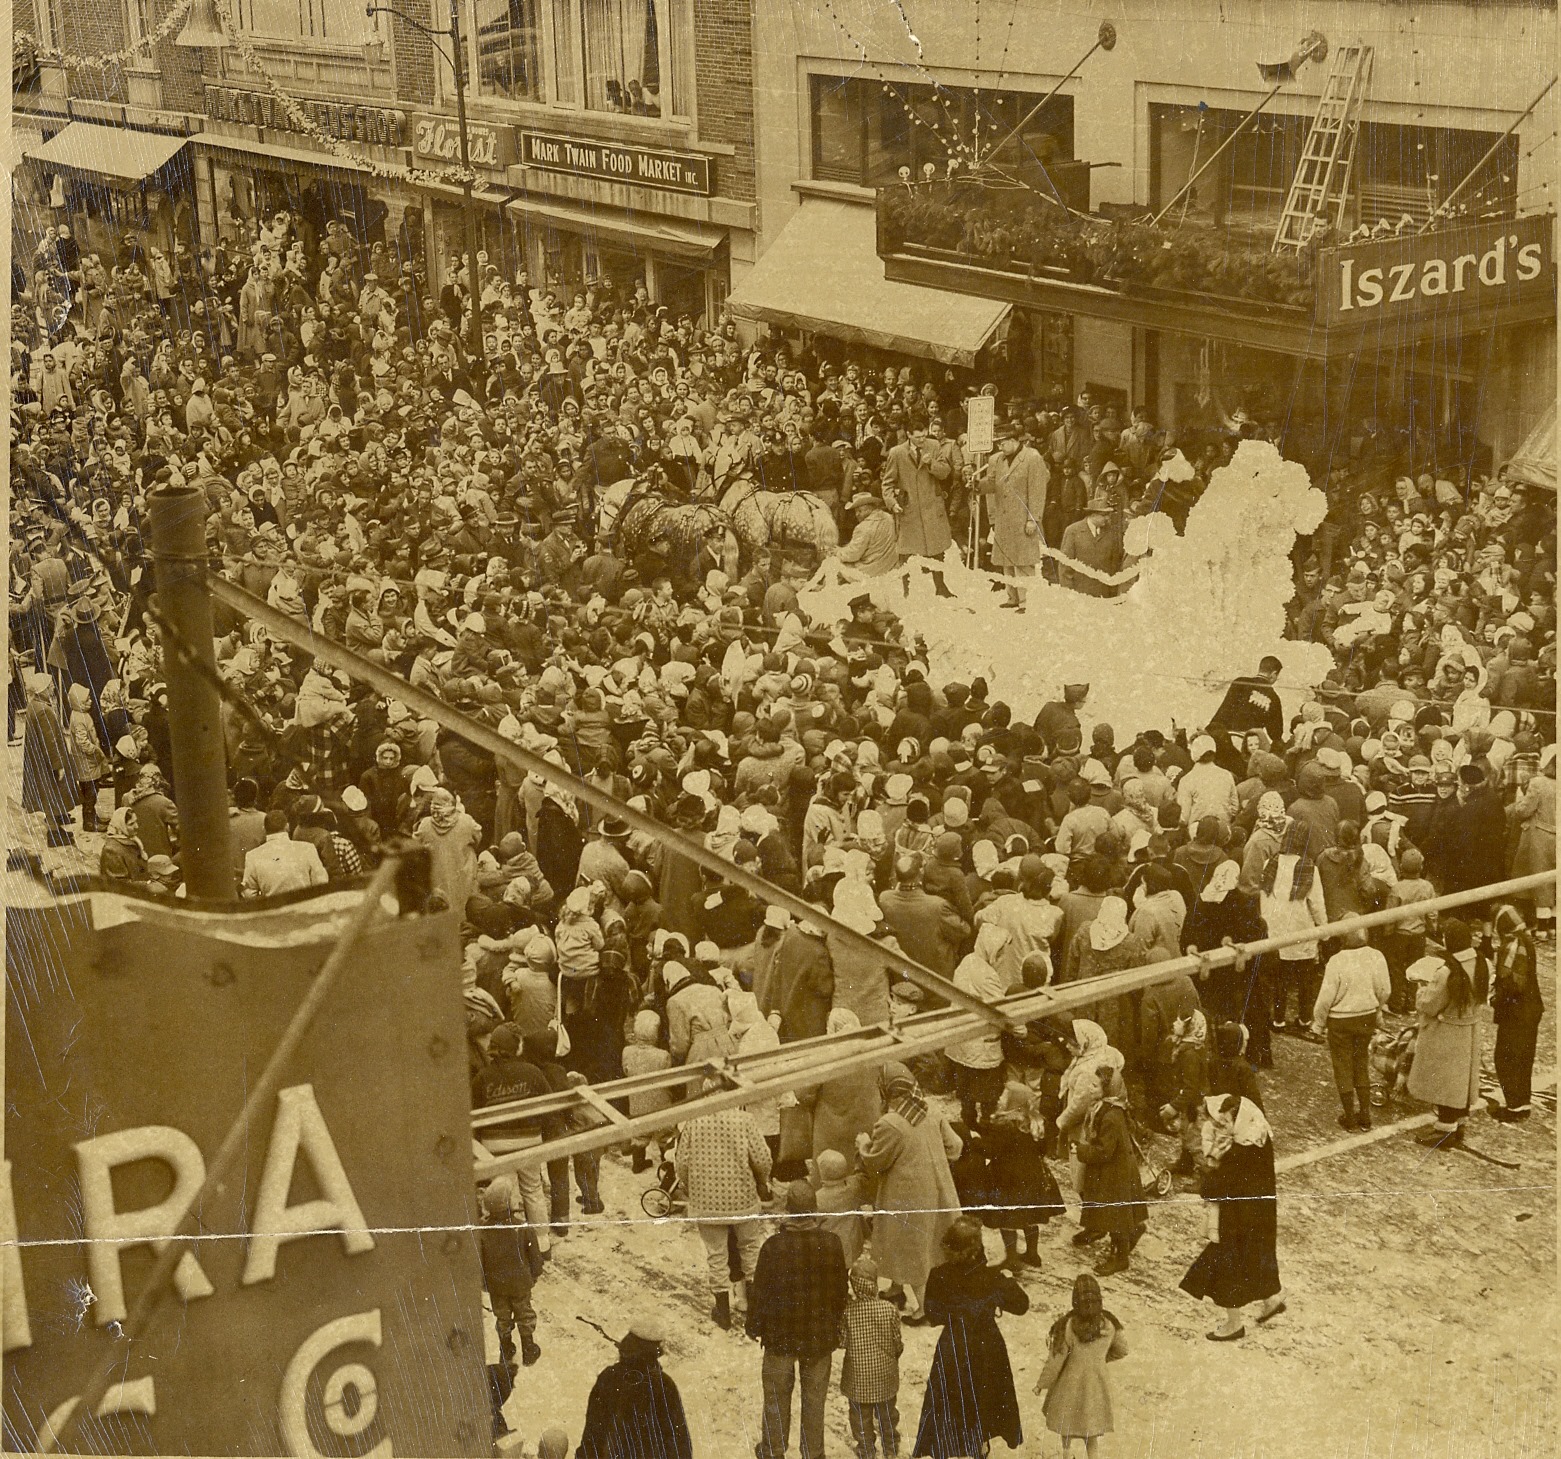
This image got the most attention. Since we posted photographs in chronological order, it was also the oldest confirmed photo in the album. It was taken in 1958, and shows a crowd of people surrounding a horse drawn sleigh in front of Iszard’s Department store. Best guess is it was the end of that year’s parade. On the sleigh, Santa is joined by two official-looking men wearing winter coats. Most of the crowd are wearing coats and hats and many women are wearing scarves on their heads. One observer commented he remembered watching Santa get off the train and climb down for the parade. Others remembered shopping on crowded streets. While a few remembered specific food they ate at Iszard’s. Cream cheese and olive sandwiches anyone?


Second in popularity was this crowd scene from 1966. Here the image includes mostly children intently watching something just out of the picture frame. A few children are waving. One observer recognized himself in the crowd. It must have been warmer that year, because fewer people are wearing hats and there are no winter boots in sight.


The third photograph was also taken in 1966. You can see a group of Southside High School baton twirlers high-stepping down the street followed closely by a marching band. Onlookers line the side of the street, and a partial view of the viaduct span can be seen. One observer recognized her mother performing with a baton.


The fourth photograph was also from 1966. It shows two men dressed in Batman and Robin costumes astride motorcycles. They both look off to the side at something out of the photograph’s frame, and have their feet on the ground, indicating they are paused. A crowd of children and adults watch. While no one left any comments on this image, it clearly sparked nostalgia.


The fifth most popular photograph was taken in 1969. The image shows two young women carrying a banner for Southside’s High School Band which follows behind. Behind the banner are two processional flags. Both sides of the street are lined with onlookers. Commenters on this image recognized themselves or other band members.

Winter holidays often inspire us to look back at the past, whether fifty years ago, twenty-five years ago or the year about to pass. We hope you enjoy seeing these again. Whatever traditions you celebrate, we hope you share them with friends and family, and maybe a cream cheese and olive sandwich on the side.

Monday, December 12, 2022

So You Want To Be An Oral Historian

By Rachel Dworkin, Archivist


The majority of the human experience will be lost to time.  The most pivotal moments in people’s lives rarely make the newspapers, let alone the history books. Once someone dies, their memories die with them, but you can do your part to preserve them through Oral History and the Holidays are the ideal time to learn how.

At its core, oral history is about capturing, preserving, and sharing the lived experiences of individuals whose stories might otherwise be lost. In the late 1800s, American anthropologists began recording Native American folklore in phonographic cylinders.  The oral history movement began in earnest in the United States in the 1930s with the Federal Writers’ Project under the New Deal. Out-of-work writers were hired by the Federal government to listen to and record the stories of everyday Americans. The Slave Narrative Collection, for example, recorded the recollections of over 2,300 formerly enslaved individuals. Many of those narratives are available online for free via the Library of Congress website and have proved vital to researchers.

The oral history movement picked up steam in the 1960s and ‘70s as recording equipment became cheaper and more portable.  Here at the Chemung County Historical Society, we began collecting oral histories on audio cassette back in the 1980s. Currently, we have over 300 oral histories on a variety of mediums including audio cassettes, VHS, and mp3s. Some of our projects include the Veterans’ Oral History Project, the Black Oral History Project, the Recollections of the 1972 Flood Project, and the COVID Memory Project. Several of these projects are still on-going if you would like to participate. Our Black Oral History Project and COVID Memory Project are available on our YouTube page. All other interviews are indexed on our website and can be listened to at our offices. 


Drawer one of our Oral History collection

Of course, you don’t have to be a professional historian, anthropologists, or folklorist to be an oral historian and capture the stories of your own family and community. These days, in fact, it’s easier than ever to get involved. Here are seven steps for conducting your own oral histories:

STEP 1: Selecting your equipment

Here at CCHS, we currently use a high-end Yeti microphone paired with a computer running Audacity, a free, open-source audio recording software. When I first started here, we were using a mini-DV camcorder. You can use what you have, but the easiest is probably going to be your cellphone. StoryCorps, a non-profit dedicating to preserving and sharing humanity’s stories, has a free app you can download to help you record your oral histories. All stories recorded through their app get saved to their servers. If you and your interviewees would prefer to keep the interview private, simply use the audio recording function on most smartphones. You can also conduct and record interviews on the computer via Zoom. 

Recent interviewee with our Yeti microphone

 STEP 2: Select a theme or topic

Most people have a lot of stories. To keep yourself from being overwhelmed, you’re going to want to pick one topic, theme, or subject to focus on. Some recent topics we’ve explored here at CCHS include: growing up on Elmira’s Eastside, the impact of the COVID pandemic, and the flood of 1972.

STEP 3: Obtain the consent of potential interviewee(s)

Oral history is a collaborative act. You’re going to want to make sure the participants are 100% on board with the project. Tell them exactly what you are doing and why before you start recording. Make sure they know they can stop at any time should they become upset or uncomfortable. Be sure to stop if they ask to.

STEP 4: Press record

STEP 5: The Interview

When beginning an interview, I usually do a quick introduction: my name, the date, the name of the project, and the name of the interviewee. You should do something similar.

You’re going to want to ask a mix of specific and open-ended questions. Specific questions like what high school did you go to? when did you enlist? and how long have you worked for [company]? are vital for providing context for the story the person will tell. Once you’ve established the basics, you can ask the more open-ended questions like what was high school like back then? what do you remember about the army? and what was it like working for [company]?  These more open-ended questions allow the interviewee to really share their story. From there, you can ask additional questions to follow up on or clarify things they brought up.

The last question should always be to ask if there’s anything else they’d like to say related to the topic.

Be sure to thank the interviewee for participating.

STEP 6: Save and label the recording

Back in the day, we’d literally labeled the cassette tape with the name of the interviewee and date of the recording. These days, I save the digital file with the name and date as the tittle. For example, Rachel Dworkin.12.12.2022.mp3. You’re going to want to do the same. Be sure to save it more than one place.

STEP 7: Transcribe?

Here at CCHS, we transcribe all our interviews. This involves listening to the interview and writing down literally ever single word. It is a highly labor-intensive process which we could not manage without our dedicated volunteers. A 30-minute interview can take over 4 hours to transcribe! We do this to help future researchers and people who are hard of hearing. It’s up to you whether you want to do something similar.

Now that you know how, get out there and record some history!